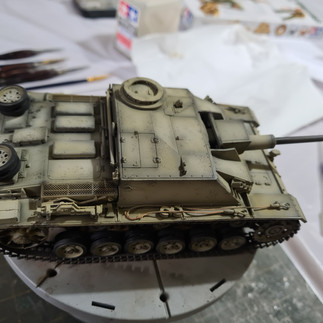
Stug III. ausf G. - Summer 1943
After being into the big cats it seemed to be a refreshing idea to get back to one of may favorite armored vehicle, the Stug III. These vehicles were originally designed to support infantry and were equipped with a short barrel gun in the beginning of the war. Although they had proven themselves in this role they were quite successful as anti-tank weapons too. Changing their main gun to the long-barrel (L/48, 75mm) one in 1942 ensured their success. More than 10,000 of them were built until the end of the war.
After a quick look around on the market I had to realize that although Dragon still has a decent assortment to offer they have gone pretty pricy. On the other hand Takom has recently released a kit in it's Blitz series for a much more reasonable price at the level of £30-£35. I really loved the Jagdtiger of the same series, so I had no reason to hesitate. Was I right? Let's see.
The kit is nicely detailed, the materials are superb, easy to work with. I quite like the 'Continental' logo on the rubber rims of the roadwheels although this is not the first kit I came across with it.
Usually, I am the one who suggests that getting familiarized with the instruction thoroughly before start building is very important. However, this time I have missed something: I did not realize that the sequence of attaching the parts in step 5. is essential. You need to start with the photo-etched part first and then do the rest. The picture is not necessarily the best visual indication of it in my opinion, so you need to watch out for it...
Luckily, it is not the end of the world if you miss it as it is easy to cut the grill into three pieces and attach them separately after a bit of filing. Or, you can even decide to skip it as no one will really see it anyway.
The sides of the lower hull will be clearly exposed in the final model, so I wanted to make sure this part of the vehicle looks good. Once the wheels and the tracks are attached it will be hard to do proper weathering. However, attaching them later can be tricky as the kit comes with length&link tracks. I have seen other modellers gluing the tracks and the wheels together, but fixing them in their final location only at a later stage after when the rest of the model is complete and all the paintwork and waethering is done. That is certainly an option, (probably the best), but I have personally never tried it out. Instead, I decided to kick off the basic paintwork and weathering right at this stage:
- main colour of the hull and the wheels (Tamiya xf60 fark yellow and Tamiya xf85 Rubber black)
- base colour for the tracks (Tamiya xf84 Dark Iron)
- texture for weathering (AK's Thick mud and various AK pigments)
The rest of the build was easy, too. The parts are fitting perfectly, no need to fill anywhere. The PE parts are nicely done and they are not unnecesarily tiny. Some would argue that the clatches for example look significantly better when they are PE, but I think for the price of this kit it goes as far as plastic can go, so no reason to complain.
Once the build was complete, the paintwork started with pre-shading followed by the application of the main colour. The base colour was thinned decently and airbrushed in a very thin layer. Then, mixed with white to do some colour modulation: certain surfaces (mainly the horizontal ones) are often fading and wearing out more intensely. To indicate it on the model makes it more relaistic.
The chipping is done with a little piece of sponge. Just make sure you test it on a paper first and only apply on the model once you are fully happy. Be careful, it is better to do less than over do it. Tha barrel was painted with Tamiya xf84 Dark iron.
Gloss varnish was applied in order to seal the basic paint work and to help with the decals. I usually use decal softeners (MicroSet & MicrSol) to achieve perfect fitting and in my experience it helps the insignia look as if they were painted.
Although the gloss varnish makes the weathering look odd, you don't need to worry about it too much. It is not yet finished anyway.

Once the whole model fully dried a layer of flat clear was airbrushed onto it to seal the work done so far. Then came the painting of the tools: the shovel, the hammer, the axe, the wire- cutter...etc.
At this stage I started to add enamel washes: they contribute a lot to weathering the vehicle. AK's Track Rust wash, Dark Wash, rather light touches here and there. And, Mig's Blue Black panel liner was also used.

I was also working on the mud behind the wheels. I added pigments: AK's Europe earth, Factory ground and Light dust, primarily. So far, I thought white spirit is the way to fix pigments, but in a youtube video I saw someone using Tamiya's x20 thinner for this purpose. I have to admit it worked really well.
The tracks got a wash made from Track Rust pigment of AK and then wiped it off with a cosmetic sponge after they dried properly. The same was done to them with a mix of 'dirt' wash (same pigments were used as for the hull). Finally, the surfaces that meet the ground were treated gently with a soft graphite, just like the relevant parts of the gear and ilder wheels.
I have to admit that I thought a lot on the stowage. There are plenty of archive photos showing stug's packed like hell. Of course, these were taken in peaceful moments of the war and not in combat, nevertheless I was really tempted to replicate it on this model. I had looked at hundereds of pictures while hesitating and doubting. Special crates were often welded to the engine deck as a field modification on these tank destroyers so as they could carry more stuff. Then, I saw these photos. I don't know how the spare tracks were fixed ecactly, but this captured my imagination.
I had plenty of spare tracks and aftermarket products in my stash, so I went for it at the end.
And basically that was it. What is my opinion of the kit overall?
- Nicely designed, easy to build kit without any fiting issues
- Good balance of details and practicality (although this is subjective, some of you guys may prefer more PE and metal barrel
- Length&link tracks are easy-to-assemble, still good looking tracks
- Great price
I frankly believe you can build a real shelf-queen from it even without adding any extra stowage. I highly recommend it.
Here we go with some photos of my final tank-destroyer.


Comments